Monday, December 27, 2010

Tjaps

I was playing with my tjaps today and these are the results. It worked better this time because I didn't use as much wax. Having a felt pad in the pan to use as a stamp pad seemed to work better than just dipping it in a pool of wax. I also did up a padded board, rather than just using some padding under the plastic sheet. Just used an old tshirt on a piece of cardboard covered with plastic. Since the tjaps are used, they are a bit uneven.

The solid red and green ones are silk hankies. It is nice to have small, inexpensive items to practice with. The other times I've tried using them on silk they carried way to much wax and it wicked too much. The color looks a little off because they haven't been steamed yet.


The multicolor is another practice shirt. Previously known as one I would wear while painting. I'm going to give it a try on an actual shirt and see how it turns out. I needed to do some touch up on it so I want to see how well it blocks the wax. It hasn't been dyed yet, so the wax doesn't show very boldly.

Monday, December 13, 2010

Variety


Not all of the scarves I've done lately have been red, I've also done some blue & purple. I'm really happy how the pattern on this one turned out. Tilting it up on one side makes the dye move differently. It kind of looks like little snowballs rolling down a hill.

Thursday, December 9, 2010

The sun


The first picture is one of the sun that I found due to this blog post, and is amazing. Who knew that the sun could look like that?


So this scarf is what I hope is similar colors. I would love to create something that looks exactly the same as the image. But I haven't figured that out yet.

Tuesday, December 7, 2010

Dreams


This makes we want to sing a modified Christmas song I'm dreaming of a psychedelic Christmas.

Monday, December 6, 2010

Project

These pictures are the same project.
In the first one, the scarf has been stretched and painted with dye. The salt was just sprinkled on it.


The next one is after it dried. The salt pulled the dye into the patterns. It looks a bit lighter than it will after it's been steamed.


The last one is after steam setting, washing and ironing. Although it is Crepe de Chine and wouldn't need to be ironed, you know how it is when you'll be showing it to a lot of other people.


Did I mention that I really like the pattern the salt makes in the dye? The one on the stretchers right now I put a lot more salt on & smaller granules. We'll see how that ones turns out.
I also want to try some kosher salt. So far, I've been using rock salt. Kosher would be much smaller flakes. I'm hoping for a more 'foamy' appearance.

Sunday, December 5, 2010

Stretching


This is the setup I use to stretch silk scarves. The frame is some left over salvaged flooring. What I installed upstairs looks a lot better than this.

By assembling it like a pinwheel, it makes it easy to adjust the size. The tongue and groove of it helps keep the pieces in place better.
The red things are regular woodworking clamps.
The blue silk hooks are attached with rubber bands to keep tension. When silk scarves get dampened they stretch a bit.
On the table is heavy vinyl from the fabric store.
I don't want the scarf to sit right on the vinyl so I put some pieces of 2x4s under the frame to elevate it.

Friday, December 3, 2010

More


I've been busy getting items done for the Women's Art Festival on the 11th, a week from tomorrow. Of course, I expect everyone I know to by just dyeing to be there. (Did I mention I tell bad jokes.) I'll have a lot more choices then.

We'll see how much more I can get done in a week. Just so long as I'm not up until midnight the night before. When we have to be up early the next morning to load the car and set up, we notice we aren't as young as we'd like to be. Just so long as I remember my pepsi.

Tuesday, November 30, 2010

Figures


You know, it isn't easy to find anatomically correct line drawings for dragonflies. But I was able to find some good photos of some. Photos taken to help catalog and identify various ones. So that is what I used to create the shape for this one.

It's a lot easier to find pictures of koi in all sorts of poses.

Sunday, November 28, 2010

Hair


Look, it's a self portrait of me in the morning.

Friday, November 26, 2010

Color


Another example of how different fabrics turn out different colors.

Both were in the same dye bath. The shirt is a cotton knit, while the square is a silk weave. Silk can be dyed with fiber reactive dye, the type of dye you use for plant fibers. But the dye reacts differently with silk. It's still a pretty color, you just have to know it'll be different.

Also, both were stitched up as the Mokume Shibori technique. But the silk just didn't compress like the cotton. I think partly because the shirt is a knit and is able to be compressed more. And partly because the cotton threads ore a bit thicker. If I want to do a silk scarf with a stitched resist, I'll have to sew it the long way, rather than the short way. Otherwise the pattern just doesn't show up as much as I'd like.

Wednesday, November 24, 2010

Train


I doubt my Dad will read my blog before tomorrow afternoon. This is a picture of his birthday present. He's a big train buff and I know he'll like it. And not just because his daughter made it for him.

Sunday, November 21, 2010

Crystals


The salt that I put on the silk to move the dye picks up some color. It looks like crystals or sugar sprinkles. It looks so pretty.

Thursday, November 18, 2010

Practice


Too bad silk hankies aren't popular. But they do make nice practice items. They're much smaller and easier to work with than a full size scarf. And cheaper, of course.

I'm trying a different kind of dye for silk and needed to try it out to see how to work with it and how the colors look. I have a couple more in the basement that I'll steam tonight. But these are all done but the ironing.

Monday, November 15, 2010

Butterflies


Well, this time of year in Minneapolis we don't have any more butterflies and flowers. But this is a way to keep some around all year.

Friday, November 12, 2010

Mmmm, cake


I have to share this item. Lemon poppy soap. I make lemon poppy muffins now and again and this does smell just like it. Not just a lemon scent, but vanilla and cake scent also. Makes me want to make some.

Thursday, November 11, 2010

Safari


Why should kids have all of the fun? At the show at Gustavus Adolphus two ladies were looking at children's tshirts with a similar design and mentioned that they would like a shirt like that also. So I've made some safari theme batik tshirts for adults.

It would be great for when you are just hanging around. I know, a bad joke. But I'm known for it. Good thing I dye clothing rather than do stand up.

Monday, November 8, 2010

Strawberry


I think the color looks like a strawberry smoothie.

The variation in the color comes by not stirring it as often. You have to just let it sit a while. It seems like I should stir more, since the instructions always tell you to do that. But sometimes, it looks better when you don't.

Wednesday, November 3, 2010

Salt


I really like how this scarf turned out. It took me a couple tries to get what I wanted. It's a silk & wool blend and feels nice and airy also.

Salt draws water to it. If you have the scarf really wet with dye and put some large crystals of salt on top of it, the dye will get pulled towards the dye along with the water. That is why there are darker spots.

Well, and I really like the colors, but I'd be pleased with how it turned out even if it wasn't sapphire and amethyst.

Tuesday, November 2, 2010

Show

I'll be participating in a show at St Philip's Lutheran Church this Saturday, the 6th, from 10am to 3pm. Join us.
It is at the corner of Central Ave NE and 61st Ave NE and has a large parking lot. The address is 6180 Highway 65 N.E. Fridley.

Sunday, October 31, 2010

Bright


Another picture of the tray I made in use. To make the stars and stripes shirts I need to dye both colors at the same time. If you put a small piece of wood across the middle, it helps to keep the dye from running from one side of the tray to the other. Since the basement floor isn't exactly level.

The colors look a lot brighter now then they will after they've been rinsed and washed. You can even see some of the stars that are done with the batik method.

Saturday, October 23, 2010

Purple


I just love purple, and I love the look of Mokume Shibori. I'm really happy with how this turned out.

It isn't the picture that is faded on the edges. It is the shirt itself. I only stitched a band across the shirt instead of stitching the whole thing. The color of the shirt fades like that. The shadings that happen using this technique are so interesting.

Thursday, October 21, 2010

Metals


Don't worry, I don't plan to wear these all together. But they have a common color.

All three silk scarves were braided together and dyed bronze. Then re-braided separately and dyed orange, green and maroon/purple. I really like the way the colors separate and combine. By having them braided the dye can't get to all parts of the scarf. But like the test strip samples, the dye doesn't absorb all at the same rate as it soaks into the fabric.

Thursday, October 14, 2010

Setup


I cropped out the messier part of my work table.

This is the setup I use for melting the wax. The heat source is a 2 burner buffet warmer. You can't boil water on it, but it does a nice job for the wax. Since I use soy wax I don't need to heat it as high as paraffin or beeswax. And the thermostat on this is pretty good.

The small pot is for dipping the shapes into the wax to stamp the wax onto the shirt. The felt in the other near part of the tray works like a stamp pad, it is nice for paintbrushes so I don't get too much wax on my brush and it drips.

You can see I have an assortment of brushes. You have to try a few to see what you like best. I prefer stiffer ones. The softer ones don't work as well for me.

Monday, October 11, 2010

Test strips


A lot of the dye powder you get is a mixture of other colors. So even though you have a nice shade of red, it might have some blue or yellow in it to give it a different shade.

Sometimes the technique will allow the dye to separate. The different colors may travel through or along the fabric at different rates. The stitched Mokume technique is one where this can happen. Because the fabric is pulled up tight it keeps the dye from easily getting to all parts.

If you've tie-dyed shirts before you might have seen this. You might get a 'halo' of color at the edge of one. Also, think of the last time you tried to get 2 different pieces of navy clothing to match.

The picture is of three strips of fabric I intentionally wanted the dye to separate. I wanted to see what kind of color the halo would give me. It also gave me an idea of the color cast. All 3 were browns; mink, chocolate and bronze. But the separated colors don't look much like that. I want a brown to go with a mauve, so I think the chocolate will be best, it has the tone I like better. The bronze surprises me with how green it looks when the yellow/orange is pulled out.

To do this I used 3 small, shallow containers. Mixed up a small amount of dye in each one. The put just one end of the fabric in the dye. The dye wicked up the fabric and the color that travelled faster went up higher.

I remember doing something like this in school. We used a felt tip pen to make a dot on a coffee filter, near the bottom. Put some water in a shallow dish and put just the bottom edge of the filter in the water. The colors should separate. Try different brands of pens, even if they are all black they might still look different. Don't use permanent ink.

Wednesday, October 6, 2010

Frozen


Another post about the difference a that just a small change can make.

One of the techniques I like to do is freezing the shirt before dyeing. You soak it in the soda ash solution then wring it out pretty well. Scrunch it up and put it in a small bucket then freeze it. Take it out and put on 2-3 colors dye. As the water melts, the dye reacts to different areas of the shirt because the shirt doesn't melt all at the same time. The pattern looks kind of like frost or a granite rock.

The shirt on the left side of the picture was left in the freezer for about 2 weeks. Apparently I missed it and left it in a lot longer than I planned. The one on the right had only been in the freezer for about an hour. I'm not sure if the one on the right just wasn't completely frozen, or if the one on the left was a bit freeze dried. But the pattern in the dye looks quite different.

I think I'll leave them in the freezer longer. The pattern is really different. It really reminds me of frost on a window. Somehow, it seems appropriate since the shirts are frozen before dyeing.

Tuesday, October 5, 2010

Women's Art Festival


Plan ahead. I'll be at the YWCA's Women's Art Festival on Saturday, December 11.

They've been doing this for quite a few years, so I expect there will be quite a turnout. I hope you'll be there also.

Friday, October 1, 2010

Colors


Another picture showing the difference of how two different fabrics take up dye.

The bag is silk chiffon, the stiffer, sheer silk. The tie is either habotai or china silk. I attached the tie before putting it in the dye so it would match. But you can see the difference in color. I still think it is pretty, just worth noting in case you don't like it.

The bag is one I did for the Handmade MN show on Saturday, November 20th. There will be 2 large gift baskets you can win, as well as swag bags for the first 25 people. All items are hand made and donated by HandmadeMN members.
I'll have more pictures of some of the other bags I did.

I won't be selling at that show, there are more people than spots open. But I plan to go there to shop. I've seen some of the people's work and it is very good.

Tuesday, September 28, 2010

Tray


Sometimes reading instructions and books about other techniques gives you ideas. I wanted a large tray for dyeing but couldn't find one. But with some scrap wood, screws, binder clips and plastic sheeting I now have one.

I made mine about 4' x 2' because that fits on my work table nicely.

I got the info from reading about how to do marbling. For that you have to put the item in all at once.

Saturday, September 25, 2010

Craft Show at Gustavus Adolphus Lutheran Church


Next Saturday, October 2nd, I'll be at the Gustavus Adolphus Lutheran Church craft show. Info is also here

The church is in NE Minneapolis and will have vendors inside and out, so there will be quite a variety.

They are also having a raffle for the very nice quilt in the picture, as well as other items donated by the artists. I haven't decided yet what I'll donate, I think a scarf. I just have to pick which one.

I hope to see you there.

Tuesday, September 14, 2010

Stencils


You may notice the repeat appearance of the practice shirt underneath this stencil. I just cut out the stencil and wanted to test to see how it would turn out. I plan to recut it since it is a bit uneven. But considering it is only a practice for testing it's good enough. I like the design and think it'll look really nice along a neckline.

Reynolds freezer paper works pretty well. It isn't as durable as a plastic one, but it's a lot cheaper. Especially for practicing, or for designs you aren't sure if you'll like.

Under the tshirt I use a flexible cutting board so the wax doesn't soak through to the other side and leave shadows. Or for something flat like a scarf, to keep the wax off my work table. If it is too small for my board I use a plastic bag.

If you are using enough wax to do the batik design, the shirt should stick to the board a bit. It'll come right off, but it means the wax has soaked all the way through the fabric. You should still check the back for missed spots.

The sticking can also be useful. The stencil in the picture has a lot of detail. If I fill in sections at either end it helps keep the shirt from moving while I work on the rest.

Monday, September 13, 2010

Choices

For the eggplant purple shirt from a couple posts ago, I’m sure you can tell the color has a bit of variation. That happens when it isn’t stirred in the dye bath very often. Especially when you have a few shirts in there together.

Contrast that with the Pirate shirts, where the blue of the shirts are quite consistent.

I like the way both of them turned out. You have a lot of choices for how you do the dyeing and what kind of visual texture you can achieve.

Saturday, September 11, 2010

Variation


These two shirts were sewn with the same Mokume technique as other shirts I've done. But instead of soaking it in water before putting it in the dye bath, I just put it right into the dye. The definition and contrast between the outside and inside of the folds is much less. The pattern is more subtle.

Soaking in clear water (or water with soda ash) first will 'fill' up the fabric so when it goes into the dye bath the water that is carrying the dye can't penetrate as much. It can mainly get to the easy parts.

Tuesday, September 7, 2010

Circles


Here is the end result using the new shape I made. I love this color. A nice, rich eggplant, or aubergine for people from the UK. I think aubergine makes it sound more appealing than eggplant.

I'm also happy with how the dye has variation in it.

If you've met me at a craft show, you know I don't have everything I've made listed on Etsy. I worry about selling it in both places at the same time. It's also a matter of spending more time making shirts than listing them. I always feel like I don't have enough choices.

Thursday, September 2, 2010

Result


This is the result of my attempt to make a shape to use for batik. You could also make a cutter for polymer clay this way. I don't know about using it as a cookie cutter. I don't know if the metal is food safe. I wouldn't think it would cause a problem, but I'm not a metallurgist.

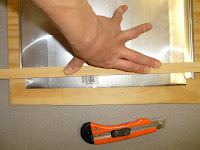
The metal flashing is pretty easy to work with. A regular utility knife scores it, so the metal can be bent and broken. I used a long piece of wood as a straightedge. And, of course, I had a piece of wood underneath the metal to try to avoid damage to my table.

Assorted objects you have around you will help shape the metal. I'm using the handle on one of my brushes to help get a nice, smooth curve. A jar or bottle would give you a larger arc. Some needle nose pliers would help also. A straight piece of scrap wood gives a nice crease.

I had problems getting the base of it staying together. If I secured them too tightly it wicked up too much wax. You can see the stamp inside the circle is kind of splotchy. So the one in the picture is my second try. Hmm, perhaps one that looks like ribbon candy.

Ideas


Ideas can come from many places. I was looking at some origami paper I have and thought that would make a nice design on a shirt.

To make a shape for batik is the next step. The round part is easy enough. Now to try to make a shape for the leaves. I have some metal flashing that is normally used for exhaust vents and such that would work. I'll put up some pictures showing how well I did after I work on it.

Tuesday, August 24, 2010

Booth


Thanks to those that stopped by this weekend to the Uptown Market. I plan to be there again this Sunday, the 29th. I hope to see you. I'm also really hoping it isn't so hot. But the forecast doesn't sound like that. I don't know the booth location, they sometimes rearrange them. But the above is a picture. I figured since I took one to send to my Mom, I could post it here also.

Sunday, August 22, 2010

Arrr


Talk Like a Pirate Day is next month, Sept 19th. So, of course, I had to do a tshirt with a pirate on it. And of course, Pirate vs Ninja.

Monday, August 16, 2010

Shapes


I know it is hard to take pictures of plastic, but I tried anyway.

I found these nice stencils on clearance at the local craft store. They're actually intended to be used for embossing paper, but can be used like a normal stencil also.

So the other picture is a waxed design on a shirt using a small portion of the stencil for the scroll shape at the bottom. I think I'm going to repeat the pattern on the back. I like to decorate the back of the shirts also. I think it makes it more interesting. As you can see, it works even better to take pictures of wax on white shirts. It helps to cover the flash a little bit. It keeps it from looking completely white, but isn't too dull either.

Friday, August 13, 2010

Textures


The leaf on the left was stitched like the Mokume shirts. Several rows of stitching to control the texture.

The one on the right was stitched only along the outside edge. Then gathered up and the thread wrapped around the part sticking up.

The straight line along the edge was just a single, straight row of stitching.

Tuesday, August 3, 2010

Canvas


Another example of when wax doesn't soak all the way through the fabric and the differences between different kinds of fabric. It wasn't a problem since this was a practice piece. But still, you want your project to turn out well.

It's pretty obvious from the back side that I needed to wax the back also. It's kind of interesting how the back of the fabric dyed but the front didn't. Normally, the dye will get a lot more even front and back, but perhaps not so solid on the fabric where I didn't wax well enough. But since this was a heavier canvas fabric it is quite different on both sides.

The splotchiness of the dye is because I didn't stir it much while it sat. Some of it was above the dye bath. And the green marks from a previous practice/test session of trying out painting with thickened dye. I still need to remember to do something with my sodium alginate solution. Last I looked at it, it wasn't too bad.