Tuesday, September 28, 2010

Tray


Sometimes reading instructions and books about other techniques gives you ideas. I wanted a large tray for dyeing but couldn't find one. But with some scrap wood, screws, binder clips and plastic sheeting I now have one.

I made mine about 4' x 2' because that fits on my work table nicely.

I got the info from reading about how to do marbling. For that you have to put the item in all at once.

Saturday, September 25, 2010

Craft Show at Gustavus Adolphus Lutheran Church


Next Saturday, October 2nd, I'll be at the Gustavus Adolphus Lutheran Church craft show. Info is also here

The church is in NE Minneapolis and will have vendors inside and out, so there will be quite a variety.

They are also having a raffle for the very nice quilt in the picture, as well as other items donated by the artists. I haven't decided yet what I'll donate, I think a scarf. I just have to pick which one.

I hope to see you there.

Tuesday, September 14, 2010

Stencils


You may notice the repeat appearance of the practice shirt underneath this stencil. I just cut out the stencil and wanted to test to see how it would turn out. I plan to recut it since it is a bit uneven. But considering it is only a practice for testing it's good enough. I like the design and think it'll look really nice along a neckline.

Reynolds freezer paper works pretty well. It isn't as durable as a plastic one, but it's a lot cheaper. Especially for practicing, or for designs you aren't sure if you'll like.

Under the tshirt I use a flexible cutting board so the wax doesn't soak through to the other side and leave shadows. Or for something flat like a scarf, to keep the wax off my work table. If it is too small for my board I use a plastic bag.

If you are using enough wax to do the batik design, the shirt should stick to the board a bit. It'll come right off, but it means the wax has soaked all the way through the fabric. You should still check the back for missed spots.

The sticking can also be useful. The stencil in the picture has a lot of detail. If I fill in sections at either end it helps keep the shirt from moving while I work on the rest.

Monday, September 13, 2010

Choices

For the eggplant purple shirt from a couple posts ago, I’m sure you can tell the color has a bit of variation. That happens when it isn’t stirred in the dye bath very often. Especially when you have a few shirts in there together.

Contrast that with the Pirate shirts, where the blue of the shirts are quite consistent.

I like the way both of them turned out. You have a lot of choices for how you do the dyeing and what kind of visual texture you can achieve.

Saturday, September 11, 2010

Variation


These two shirts were sewn with the same Mokume technique as other shirts I've done. But instead of soaking it in water before putting it in the dye bath, I just put it right into the dye. The definition and contrast between the outside and inside of the folds is much less. The pattern is more subtle.

Soaking in clear water (or water with soda ash) first will 'fill' up the fabric so when it goes into the dye bath the water that is carrying the dye can't penetrate as much. It can mainly get to the easy parts.

Tuesday, September 7, 2010

Circles


Here is the end result using the new shape I made. I love this color. A nice, rich eggplant, or aubergine for people from the UK. I think aubergine makes it sound more appealing than eggplant.

I'm also happy with how the dye has variation in it.

If you've met me at a craft show, you know I don't have everything I've made listed on Etsy. I worry about selling it in both places at the same time. It's also a matter of spending more time making shirts than listing them. I always feel like I don't have enough choices.

Thursday, September 2, 2010

Result


This is the result of my attempt to make a shape to use for batik. You could also make a cutter for polymer clay this way. I don't know about using it as a cookie cutter. I don't know if the metal is food safe. I wouldn't think it would cause a problem, but I'm not a metallurgist.

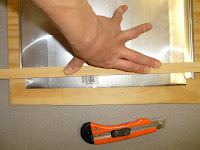
The metal flashing is pretty easy to work with. A regular utility knife scores it, so the metal can be bent and broken. I used a long piece of wood as a straightedge. And, of course, I had a piece of wood underneath the metal to try to avoid damage to my table.

Assorted objects you have around you will help shape the metal. I'm using the handle on one of my brushes to help get a nice, smooth curve. A jar or bottle would give you a larger arc. Some needle nose pliers would help also. A straight piece of scrap wood gives a nice crease.

I had problems getting the base of it staying together. If I secured them too tightly it wicked up too much wax. You can see the stamp inside the circle is kind of splotchy. So the one in the picture is my second try. Hmm, perhaps one that looks like ribbon candy.

Ideas


Ideas can come from many places. I was looking at some origami paper I have and thought that would make a nice design on a shirt.

To make a shape for batik is the next step. The round part is easy enough. Now to try to make a shape for the leaves. I have some metal flashing that is normally used for exhaust vents and such that would work. I'll put up some pictures showing how well I did after I work on it.